|
![]()
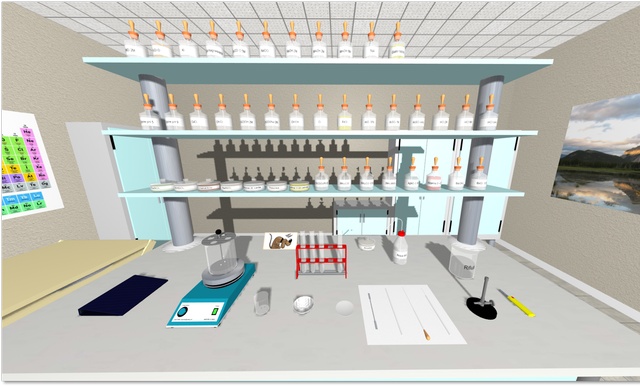
Laboratory Simulator of Inorganic Qualitative Analysis
1. What is LabSim
LabSim is chemistry laboratory simulator of inorganic qualitative analysis. In more detail, it is a 3D web application developed to run within an internet browser based on Chromium such as Google Chrome and Microsoft Edge.
The main features are:
- based on A-Frame HTML framework;
- possibility to run with all hardware/software configurations supported by A-Frame including mobile devices and VR headsets;
- voice commands (e.g. "take the hydrochloric acid") to support disabled persons having difficulties in accessing a real laboratory and interacting with the input devices;
- speech synthesis to support the strudents during their experiences;
- multilanguage support (english and italian);
- based on a SQLite database, including more than 3500 reactions for the recognition of about 60 inorganic analytes;
- multimedia player integrated in the 3D environment with a large library of video tutorials.
2. What you can do
With LabSim, you can practice as in a real laboratory of qualitative inorganic analysis and the main activities are:
- Solubility test in water of a substance even in the presence of reactants such as strong/weak acids/bases;
- pH measurement of a solution with universal indicator paper;
- Phase separation by centrifugation;
- Heating by plate or water bath;
- Tests for the recognition of anions by wet method;
- Tests for the recognition of cations by wet method;
- Recognition tests by dry method (non water-soluble substances);
- Flame test;
- Complete analysis of an unknown substance (both water-soluble and non-water-soluble);
- Watching video tutorials on both virtual and real laboratory activities.
3. What you cannot do
- Carbonate and bicarbonate test with U tube.
This is not a real problem, because the effervescence is clearly visible. Moreover, it is impossible to confuse with the nitrites, because their effervescence is red colored. - Barium sulfate recognition with the solution of the anions.
This salt can be recognized because it is insoluble in strong acids and bases and it gives a positive result in the flame test (green flame). LabSim includes a video tutorial explaining how to properly analyze barium sulfate. - pH measurement transferring the liquid with the stirrer.
Liquid transfers are only possible with the dropper. - Sodium and potassium recognition by wet way.
You can perform the flame test, which gives more reliable results.
4. What you need to use LabSim
About the hardware, LabSim requires one of the following devices:
- Desktop/Laptop (Linux, MacOS, Windows)
- Tablet (Android, iOS, Windows)
- Smartphone (Android, iOS)
For a fully immersive experience, it requires:
- Stand-alone VR headset (e.g. Oculus Quest, Oculus Quest 2, etc.)
- VR headset connected to a PC (e.g. HTC, Oculus, etc.)
The internet connection is required and slow or unstable connections don't affect the LabSim operation, even if can lengthen the loading time and compromise the video playback.
Data consumption is limited to the loading phase and to the video playback.
4.1 VR headsets
Labsim was developed to work with 3D VR headsets, however was tested only with Oculus Quest. In VR mode, it requires a reduction of the scene details, that cannot needed by headset with better performances or directly linked to a PC (e.g. Oculus Link).
To reduce the graphic detail level, you must select Main menu → Seattings → disable Detailed graphics.
At this time, you cannot yet directly manipulate the objects, but you can interact with them by controller lasers.
4.2 Mobile devices
With mobile devices, LabSim uses the accelerometer for the scene rotation, however smartphones are not recommended, because have too small displays and too low GPU performances. If you cannot use a more performing device, you can improve the experience:
- by reducing the graphic details of the scene (Main menu → Settings → disable Detailed graphics);
- by connecting a cheap USB mouse through the OTG adapter (usually provided with Android smartphones);
- alternatively, by connecting a Bluetooth mouse.
5. How to start LabSim
In the address bar of the browser, type:
https://www.ddl.unimi.it/labsim/labsim.htm
After the loading screen, it will shown the copyright message:
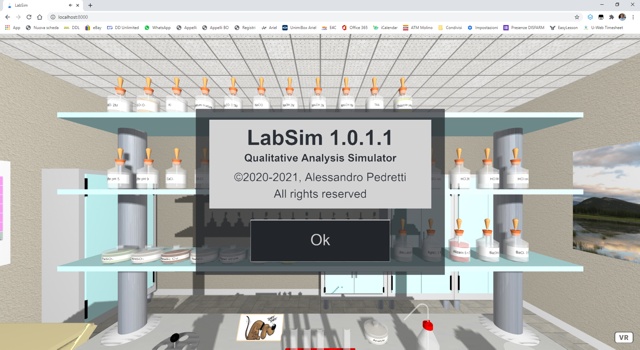
Click the Ok button to start the simulation. Clicking the VR button, you switch from widowed mode to full-screen or VR mode. Press Esc key to return to the standard display mode.
6. Input devices
This section shows the input devices supported by LabSim.
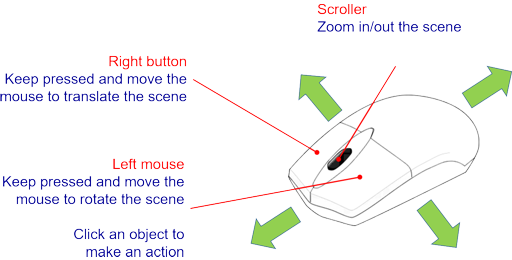
6.1 Mouse
The mouse is the preferred input device for non-VR hardware systems, because permits a very precise interaction. Here the main features supported by this device are shown:
6.2 Keyboard
Some actions are available by keyboard:
- Cursor keys translate the scene.
- Space bar and the m key show the menu.
- Esc key closes the menu.
6.3 VR controllers
The main functions of a VR controller are here summarized:
- Controller movement change the laser position.
- Pressing the triggers you have the same effect when you press the left mouse button.
6.4 Other input devices
Devices available only with tablets and smartphones:
- Screen touch (tap) is equivalent to the mouse click.
- Accelerometer rotates the scene.
7. What you can interact with
This section shows the object with which you can interact in the simulator.
7.1 What's on the workbench
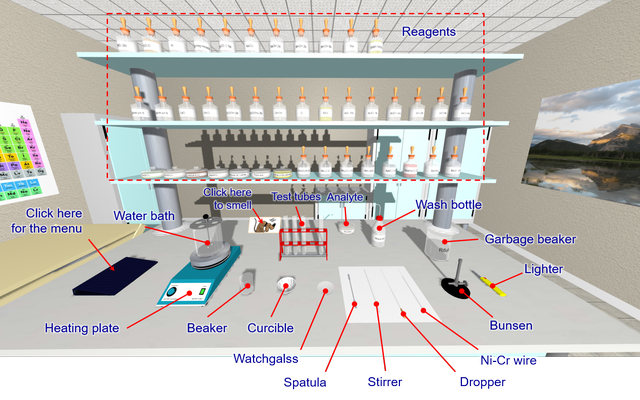
Some objects cause actions as:
- The book shows the main menu.
- The dog picture allows to smell the air or the currently selected object.
7.2 The centrifuge
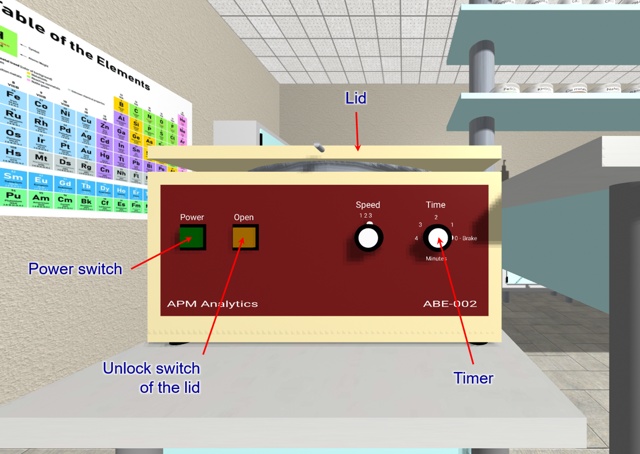
To use the centrifuge, you need:
- Turn on the centrifuge by clicking the Power switch.
- Unlock the lid by pushing the Open button.
- Open the lid by clicking it.
- Put at least two test tubes Inserire almeno due provette in the slots in diametrically opposite position, taking care because they must contain the same liquid quantity..
- Close the lid by clicking it.
- Set the timer (Timer).
For a complete phase separation, you have to centrifuge for at least 3 minutes. Watch the video-tutorial for the right use.
7.3 The television
The television hangs on the wall to the right of the workbench. Usually, it reports important messages spoken by the speech synthesis, but allows also to watch video tutorials. Clicking it, the video playlist is shown:
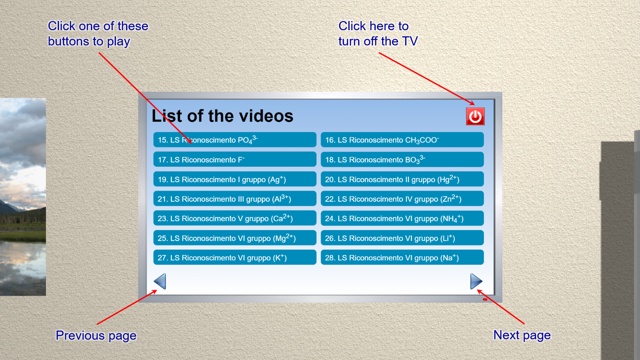
The clips with LS prefix are tutorial on LabSim, while the other ones are on experiences of a real laboratory, that can be compared with the virtual ones. When you start the video playing, moving the mouse pointer on the lower side of the TV, the controls are shown:
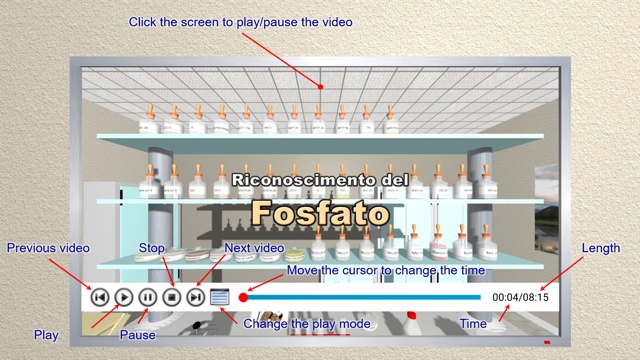
Clicking the stop button, the playlist is shown.
You can watch the clips also outside the LabSim environment by the following link:
https://www.ddl.unimi.it/labsim/video.htm
After a moment, the starting screen with the playlist is shown.
The main topics of the video are:
Tutorials on virtual laboratory (LS prefix):
- Base techniques (solubility, pH measurement, centrifuge use).
- Tests for the identifications of the anions.
- Tests for the identifications of the cations.
- Flame test.
- Analysis of water-insoluble molecules.
- Two examples of analysis of unknown molecules.
Tutorials on real laboratory:
- Tests for the identifications of the anions.
- Tests for the identifications of the cations.
- Flame test.
- Analysis of some water-insoluble molecules.
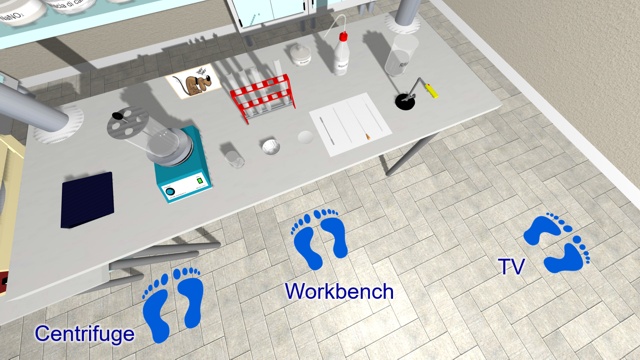
7.4 The footprints
You can easily move around the laboratory by clicking the footprints:
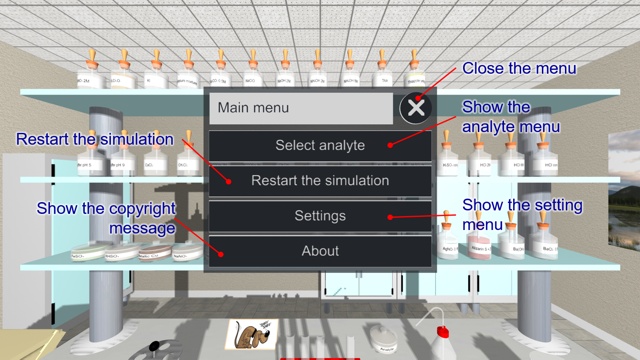
7.5 The main menu
Tho show the main menu, you have to click the book on the workbench or press space or m keys:
7.5.1 Analyte menu
In this menu, you can choose the analyte to train with:
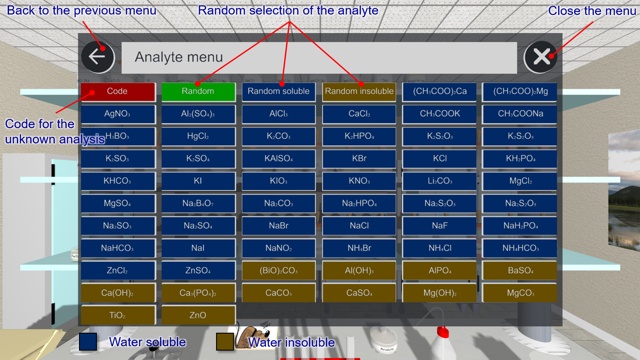
In particular, you can select:
- An unknown analyte with the code provided by the teacher.
This feature is very useful when you have to assess the the student's learning level. With a specific application avalilable on request, the teacher can automatically generate unknown analyses for the entire classroom.
Clicling this menu item, a window is shown in which you can type the six-character alphanumeric code of the analysis: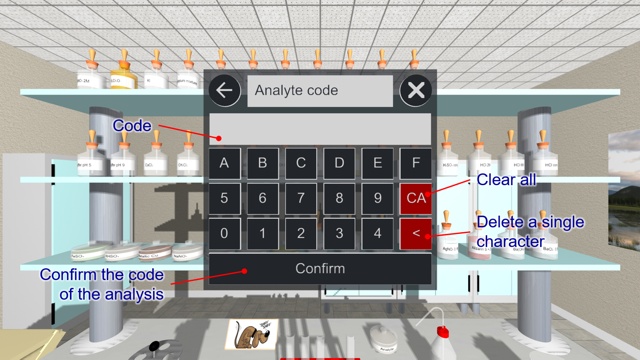
- Any blank randomly.
- A water-soluble blank randomly.
- A water-insoluble blank randomly.
- A specific analyte.
7.5.2 Settings menu
In this menu, you can change the main settings of the simulator:
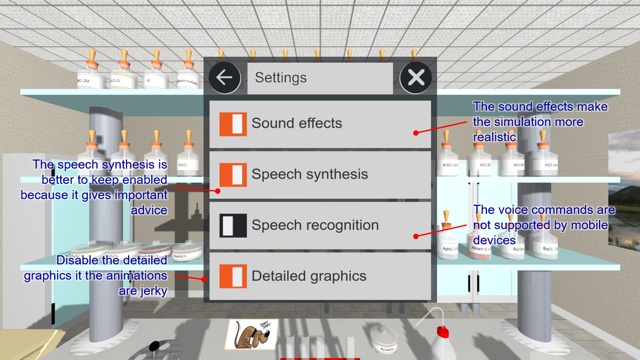
In more detail:
- Enable/disable the sound effects (default: enabled).
The sound effects make the simulation more realistic. - Enable/disable the speech synthesis (default: enabled).
The speech synthesis is better to keep enabled, because it gives important advice to the student during the simulation. - Enable/disable the speech recognition (default: disabled).
The speech recognition allows to give voice commands to LabSim without input devices. This feature is very important for people with reduced mobility capabilities. - Enable/disable the detailed graphics (default: enabled). Devices with reduced GPU power may require to disable the detailed graphics for a better immersive experience.
7.6 Interaction with the objects
The objects with which you can interact are highlighted on hover changing their color (orange or red) or size (like the book and the TV).
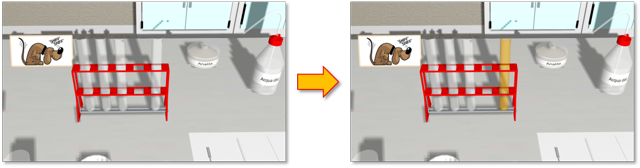
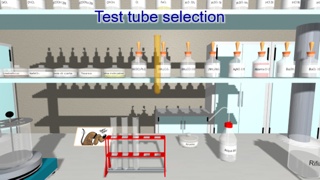
You can interact with the objects only by clicking with the mouse or touching the screen (tap). The single click (tap) selects the object or starts an action. In the case of the trash beaker, double click (double tap) empties automatically all glassware containing something. Several video tutorials show this useful action. To use an object, it must be selected by a mouse click (tap). The selection is highlighted by lifting or moving of the object in the foreground (see reagents and analyte).
 |  |
 |  |
The objects can interact each other through actions given by:
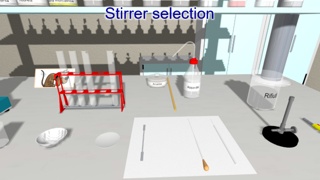
- Selecting the object 1 and clicking the object 2 (e.g. selection of the stirrer and click the test tube to stir the content).
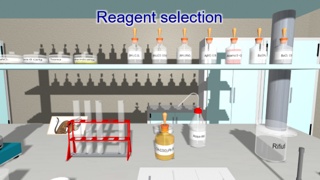
- Selecting the object, selecting the liquid reagent and clicking the reagent dropper (e.g. Selection of the test tube, selection of HCl 2M and click the reagent dropper).
- Selecting the object, selecting the solid reagent or the analyte and clicking the spatula (e.g. selection of the test tube, selection of NaNO2 and click the spatula).
WARNING
When an action is not permitted, the speech synthesis warn you and, if it is disabled, the action is just not completed without notice.
7.7 The glassware
The glassware is always dirty and needs to be rinsed with deionized water before the use. The simulator prevents the use of dirty glassware, avoiding the student from making mistakes in the analysis.
7.7.1 Generic cleaning procedure
- Click the glassware to clean (e.g. a test tube) which will be then selected.
- Click the wash bottle. Some water will be transferred to the glassware.
- Click the trash beaker. The glassware content will be emptied.
7.7.2 Dropper cleaning procedure
- Click an empty test tube. If you are not sure on its content, empty and wash it. The tube will be selected.
- Click the wash bottle. About 1 mL of water will be transferred to the tube.
- Click the dropper to select it.
- Click the test tube with the water. The dropper will suck up the tube content.
- Click the trash beaker. The content will be released.
7.7.3 Ni-Cr wire cleaning procedure:
- Turn on the bunsen setting the flame as oxidizing.
- Put some concentrated hydrochloric acid in a test tube.
- Click the test tube with HCl. The wire will be soaked in HCl.
- Cliccare la provetta con HCl. Il filo verrà immerso nell'HCl.
- Click the bunsen. The wire will be placed into the flame.
- Repeat the steps from 3 to 5 until the flame does not change more the color (usually this operation must be repeated 3 times).
7.8 Transfer of substances
The simulator approximates the liquid and solid quantities according to the action and the size of the glassware on which you act:
| Glassware | Liquid | Solid |
|---|---|---|
| Test tube | 1 mL | One spatula tip |
| Beaker | 5 mL | One spatula tip |
| Watch glass | 1 mL | One spatula |
| Curcible | 5 mL | One spatula |
| Paper | One drop | - |
Therefore, if you want to add 2 mL of water to a test tube, you need to repeat the action twice because 1 mL is transferred at time.
There are some reactions in which the quantities play an important role for their occurrence as:
- Borate test (you must add methanol at least twice so that is more than sulfuric acid and can ignite).
- Nitrate test (you must add FeSO4 at least twice so that the solution is enough concentrated to permit the formation of the brown ring).
8. Chemical reactions
LabSim is based on a database of about 3700 reactions that can occur between:
- analyte + one reagent;
- analyte + two reagents;
- two reagents;
- reaction product + one reagent;
- reagent product + two reagents.
The physical aspects influencing the result of a reaction are:
- Heat given by:
- water bath (e.g. phosphate test, tests with TAA, dichromate paper, etc.);
- electric heater (e.g. calcination with con KHSO4).
- Time.
WARNING
In order to occur correctly a reaction, the solution must be homogeneous after the addition of each reagent stirring the mixture.
9. Supporting material
In this section you can download supporting documentation to use LabSim:
- LabSim presentation (PDF, english, italian).
- Logical workflow for the correct execution of an unknown analysis (PDF, english, italian).
- List of the speech commands (PDF, english, italian).
10. Copyright and disclaimers
All trademarks and softwares directly or indirectly referred in this document, are copyrighted from legal owners. LabSim is a freeware web application only if id distributed through servers of University of Milan.
The Authors of this program accept no responsibility for hardware/software damages resulting from the use of this package. No warranty is made about the software or its performance.
![]()
is a web application develped in 2020-
by Alessandro Pedretti
All rights reserved
Alessandro Pedretti
Dipartimento di Scienze Farmaceutiche
Facoltà di Scienze del Farmaco
Università degli Studi di Milano
Via Luigi Mangiagalli, 25
I-20133 Milano - Italy
Tel. +39 02 503 19332
E-Mail: info@vegazz.net
WWW: https://www.ddl.unimi.it/labsim
© 2020-, Alessandro Pedretti - Università degli Studi di Milano
Privacy and cookies